Budgie Motion · User manual
Compose every movement
inside your sound.
Start with a playable rhythm, then explore timing, envelopes, routing mathematics and every effect control. Follow the complete walkthrough or search for a parameter.
Motion 1.0 · Revised 18 November 2026
Quick start
Budgie Motion is a rhythmic multi-effect for audio tracks. Rhythm changes how audio plays on each cell, an LFO generates a changing value, and Matrix sends that value to effect parameters. All three can work together in the same loop.
- Insert Budgie Motion in a DAW audio effect slot and loop a bar of drums or source material with a clear attack.
- Click the preset name and load Default. Start with Amount and global Mix at 100%.
- Open Rhythm and set Cell to 1/16 with 16 cells. Drag across the final two cells in the Reverse row and listen for the last half beat.
- Enable Filter and select LP. In Matrix, add a route from LFO 1 to Filter → Cutoff. While playback runs, watch the dot on the range bar and the Now readout. For a wider sweep, choose Remote and separate its two endpoints.
Use B in the header to compare against the bypassed signal. Lower Amount to pull back the motion temporarily.
Installation and licensing
Motion 1.0 supports macOS 13 or later on Apple Silicon and Intel Macs. The installer includes AU, VST3 and a standalone app. Use AU in Logic Pro and VST3 in a compatible host. If Motion is missing after installation, restart the host and rescan the corresponding format.
Sign in to BUDGIE HUB with your Budgie account to install Motion and manage your license. On first launch, use Start the 14-day trial on the activation card. If you already have a license, activate this device in HUB, then choose Check license again from the gear menu. The release build mutes audio when activation is missing or the trial has expired.
Interface and signal flow
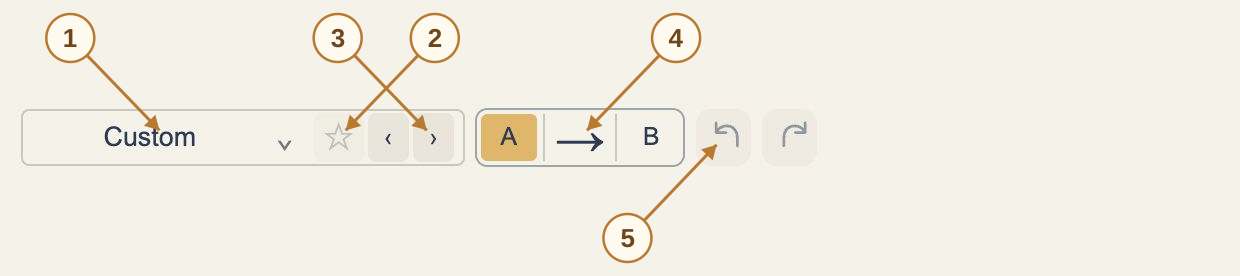
- 1Preset name / menu
Click to open the categorized preset library.
- 2☆ Favorite
Favorite the current preset and find it in Favorites.
- 3‹ / ›
Move between presets, independently of undo and redo.
- 4A / → / B
A and B select comparison states. The middle arrow copies the current state to the other slot.
- 5↶ / ↷
Undo or redo an edit. Gray means no history is available in that direction.
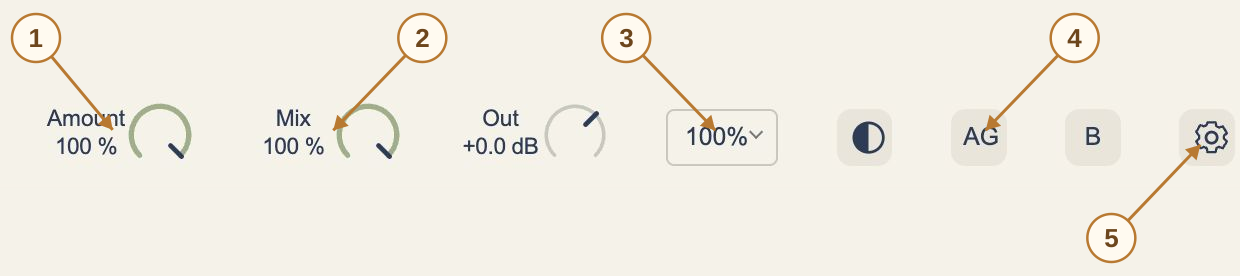
- 1Amount
Scale LFO routes and rhythmic actions while retaining static tone; this differs from Mix.
- 2Mix / Out
Mix blends the complete effect. Out adjusts gain. Double-click a value to enter it in place.
- 3100% / half-circle
The percentage changes UI size. The half-circle switches theme. Neither processes audio.
- 4AG / B
AG slowly matches loudness. Standalone B bypasses processing; it is not the comparison B slot.
- 5Gear
License, output protection, animation, language and state import/export.

- 1Rhythm / Matrix
Open time arrangement or the routing page.
- 2Module name
Click to show parameters; drag the tab to reorder processing.
- 3Power symbol
Toggle the effect directly without opening its panel.
The header contains presets, A/B, undo and redo, Amount, Mix, Out, scale, theme, AG and B. Click a module name to open its controls, or use its power icon to turn it on or off. Drag module tabs to reorder processing from left to right. The gear menu can reset the order.
The four parrot tabs select LFOs 1–4. Rhythm opens the time-effect grid. Matrix opens the routing table beside the selected LFO editor. Drag a knob to adjust it, hold Shift for fine control, or double-click a knob to enter its value in place.
The default order is Pitch → Lofi → Robot → Filter → Drive → Rhythm → Motion → Delay → Space. With Delay and Space after Rhythm, the sliced signal feeds the echo and reverb. Listen for changes to both attacks and tails after reordering.
Gear settings, appearance and state files
License and device
The gear menu shows license status, device and an available license identifier. Manage in BUDGIE HUB opens license management. After starting a trial or activating, use Check license again. Internal test builds have different license messaging; public releases use their actual activation state.
Appearance and order
The header percentage sets UI scale and the half-circle button switches theme. Language in the gear menu changes the interface language. Scene animation controls background playback without stopping the LFOs or audio processing. Reset module order restores only the chain order, not all Default parameter values.
Export and import
- Choose Export Budgie settings to save the current instance as a
.budgiemotionfile. - In another instance, choose Import Budgie settings and select the file. Import replaces the destination's current plug-in state.
- Save the existing project or export its instance before importing. A state file does not transfer device authorization.
A DAW project stores instance state; the preset library stores and selects sound designs; an exported file separately backs up and transfers current state. A/B is an editing comparison tool. Save a finished version in a preset or project.
Loudness, AG, bypass and output protection
Compare before compensating
Header AG slowly matches input and processed average energy after K weighting. Loading a preset enables AG and restarts matching. Play a representative continuous passage for a few seconds before comparing with the standalone B bypass button. The B in the A/B pair is a comparison slot, not bypass.
AG gathers approximately half a second of valid input before updating its target. Energy estimation has a roughly 0.75-second time constant and gain follows with about 0.15-second smoothing. Near-silent input does not train the estimate. Compensation is limited to 0.125–8 times, approximately ±18 dB. It does not guarantee identical perceived loudness for every transient or spectrum.
Preserving gates and tape stops
Matching is slower than individual rhythmic edges, so short gates, stops and silences remain. Sustained sparse passages can change average energy and eventually compensation. For a fixed-gain comparison, disable AG and adjust Out manually. Compare the same source passage.
Peak protection
Output protection controls peaks; AG controls average loudness. Protection always runs with AG enabled. When AG is off, the gear menu's Output protection switch determines whether it runs. It uses no lookahead, reduces excessive peaks and applies a soft knee to keep output around −0.1 dBFS or below. Heavy protection changes dynamics and tone: reduce drive, feedback or output if needed.
Standalone B bypass restores the input directly. Global Mix reaches zero before AG and protection, so with AG on it may not immediately match bypass level.
Beats, cell length and three rates
Rhythm cell duration, the LFO cycle rate and the Motion module rate are independent. Cell count times cell duration gives the Rhythm phrase length. LFO Rate gives the duration of a complete wave. Motion Rate sets the effect's own chorus, flanging or tremolo motion.
| Setting | Result in 4/4 |
|---|---|
| 16 cells at 1/16 | 4 beats, one bar |
| 16 cells at 1/8 | 8 beats, two bars |
| LFO 1 Bar, 16 steps | One sixteenth note per step |
| LFO 1/4, 16 steps | One beat per cycle, one 64th note per step |
A dotted division is 1.5 times the plain duration. A triplet is 2/3. Rhythm covers at most 16 quarter-note beats, so longer cells restrict the available count. The bar examples assume 4/4. In another meter, compare the actual number of quarter-note beats.
Host transport
During playback, Motion follows host position and tempo. When stopped, its internal clock advances at host tempo. A synced LFO derives phase from position, so transport jumps or looping can change the current phase. Free LFOs restart when the host starts playing. Start from a bar line before adjusting Phase.
Rhythm · Arrange time effects
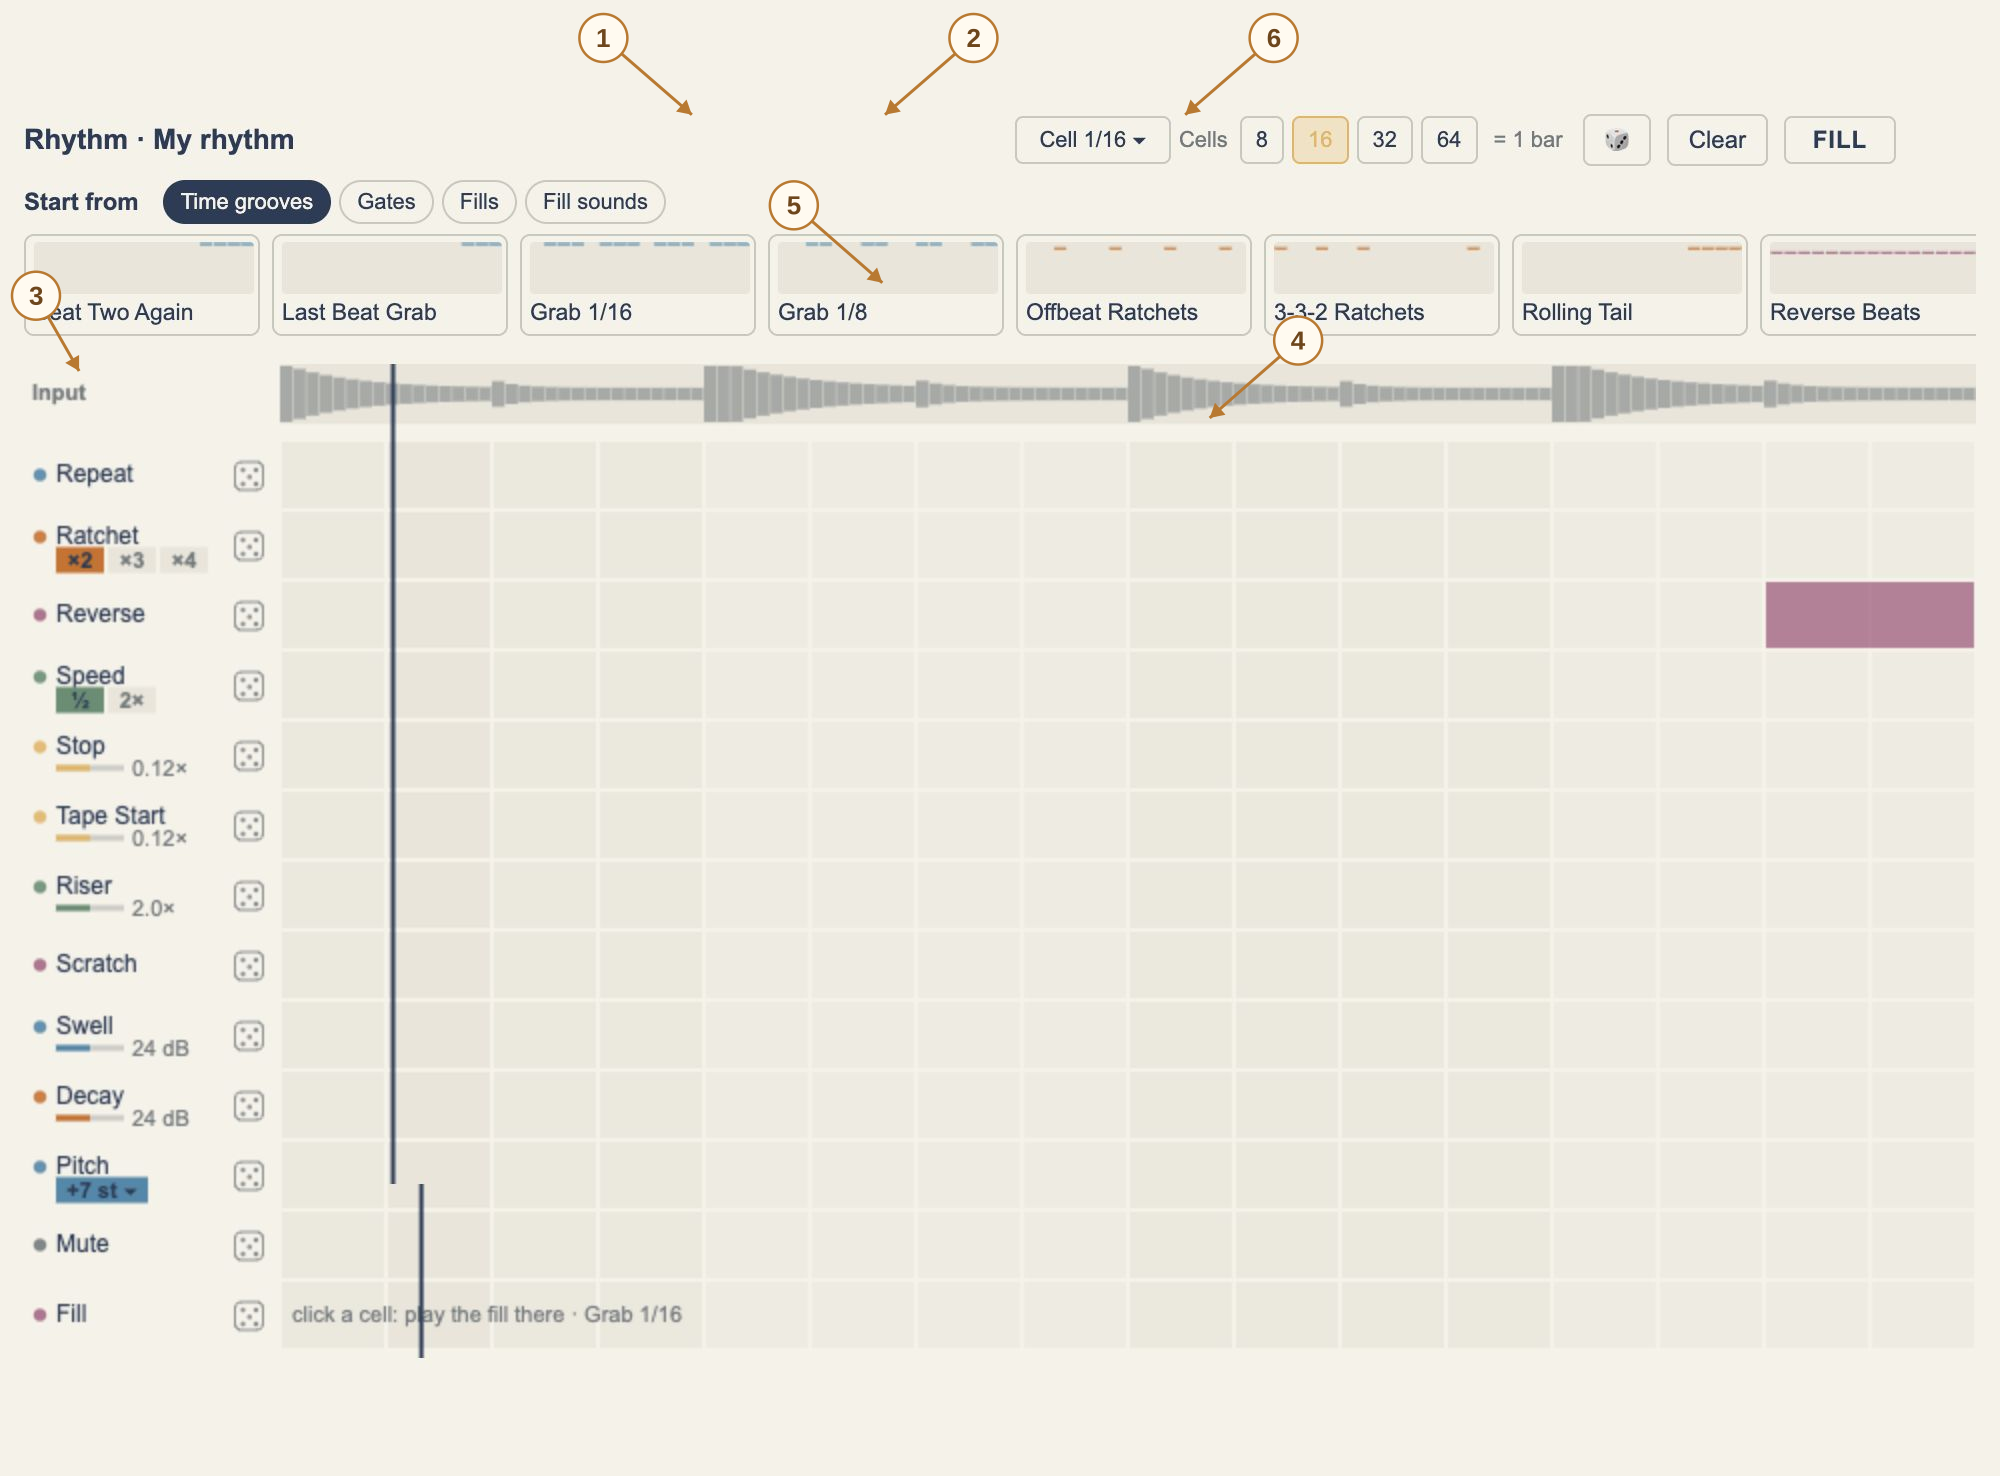
- 1Cell duration
Here each cell is a sixteenth note. Cell count times duration determines the loop length.
- 2Count and loop length
Select 16; the readout shows one bar. Rhythm count and LFO step count are separate settings.
- 3Action rows and types
Each row names an action. Choose ratchet ×2 / ×3 / ×4 or speed ½ / 2× below its row name.
- 4Reverse the final two cells
Drag across cells 15–16 on Reverse to make one continuous block. Click a matching lit cell or right-drag to erase.
- 5Vertical line = playhead
Follow the playhead column and its lit action. Empty columns play normally. The input waveform here is a web demonstration signal.
- 6Fill and dice
Hold Fill for a temporary variation. The header die rolls the pattern; row dice change that row’s actions.
Cell duration, count and playback position
Cell sets the duration of one cell. Choose 8, 16, 32 or 64 cells, subject to a 16-beat maximum. With a quarter note as one beat, 16 sixteenth notes make 4 beats and 32 make 8. Dotted and triplet divisions are available. The playhead shows the current column. A colored cell applies its action, and an empty cell plays normally.
Paint an action and set its type or depth
Click an empty cell to paint an action. Click a lit cell in the same row to erase it. Drag across cells to paint a block or right-drag to erase. Each cell stores one time action. Repeat reuses an earlier slice. Ratchet retriggers inside the cell at ×2, ×3 or ×4. Speed offers half or double speed, and Reverse plays a selected segment backwards.
Stop brakes the tape and Tape Start spins it up. Riser sweeps upward, Scratch scrubs the slice, Swell and Decay shape the level, and Mute leaves a gap. Drag sideways on a row label where a depth control is shown. In the Pitch row, choose a semitone interval and paint its timing. This row transposes through playback speed. Use the Pitch module for processing and layering the whole signal.
Starting patterns, dice and fills
Choose a pattern under Start from and edit it into your own rhythm. The top die rolls the whole grid and a row die generates a variation for that row. Time actions share cells, so newly rolled cells can replace existing actions in the same columns. Use Undo to go back.
Right-click a starting pattern to assign it as the Fill. Hold Fill to play it, release to return to the main pattern, or Shift-click to latch and unlatch. Paint the Fill row to schedule it in the loop. Routes targeting Rhythm itself also appear in its grid. Click a route row to return to that LFO.
Time actions and cell replacement
Each cell holds one time action. Painting Reverse over a Stop in the same column replaces that action. The Fill lane is stored separately. The start point and drawn extent define slice boundaries. Draw one continuous block for a continuous reversal.
| Row | Behavior and editing |
|---|---|
| Repeat | Reuses an earlier slice source. Leave an original cell before a repeat block to hear where the capture comes from. |
| Ratchet | Select ×2, ×3 or ×4 before painting. Each cell retriggers independently. |
| Reverse / Speed | Reverse a block or play it at half/double speed. Choose Speed below its row name. |
| Stop / Tape Start | Brake into a stop or recover from low speed. The depth control sets the gesture's strength. |
| Riser / Scratch | Upward speed motion and back-and-forth scrubbing. Start with a short ending and adjust depth. |
| Swell / Decay | Rising and falling level contours. Combine with silent cells to reshape accents. |
| Pitch | Choose −12, −7, −5, −3, +3, +4, +5, +7 or +12 semitones, then paint. Pitch follows playback speed. |
| Mute | Silences a cell. Erasing it restores normal playback. |
A different type overwrites a lit cell. Clicking an already lit cell of the selected type or right-dragging erases it. Changing the type selector affects subsequent painting. Existing cells retain their stored type.
Fill, dice and pattern library
Three randomization controls
The Rhythm header die generates a whole time pattern. A row die generates that row's actions. The LFO die changes its curve or step data. Since time rows share cells, a row roll can replace another action in the same column. Copy to the other A/B slot before experimenting, or use Undo afterward.
Main pattern and fill
- Left-click a starting pattern and audition it.
- Right-click another pattern to assign it as Fill.
- Hold Fill to perform it and release to return. Shift-click to latch, then Shift-click again to release.
- Paint Fill cells to schedule the variation on every loop. Erase them where the main pattern should return.
The grid shows Fill while it plays. Release or unlatch it before editing the main pattern. Clear in the header resets the grid and sequence lanes and can be undone.
LFO · Waves, drawing and steps
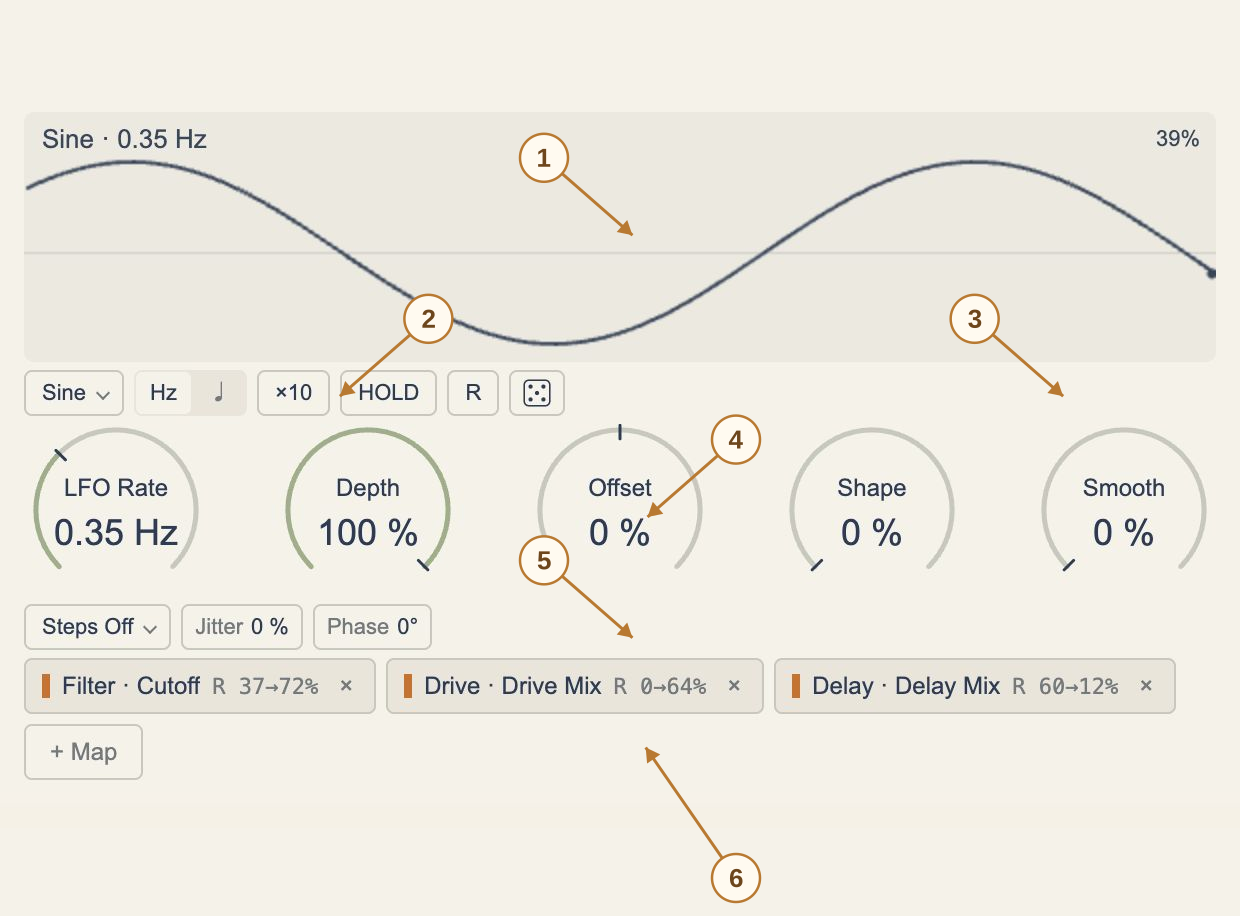
- 1Wave and current value
The header shows shape and cycle duration; the corner shows current output.
- 2Wave / Hz / ♩ / ×10
Choose waves, random, Draw or Steps. Hz runs freely, ♩ syncs to tempo, and ×10 multiplies only the free rate.
- 3HOLD / R / die
HOLD freezes output; R retriggers; the die generates a new editable rhythm shape.
- 4Five main knobs
Rate sets cycle speed; Depth scales; Offset shifts; Shape reshapes; Smooth softens edges.
- 5Quantize / Jitter / Phase
Quantize changes output levels, Jitter perturbs them, and Phase offsets the cycle.
- 6Target chips / + Map
Click a chip to edit its route. Use + Map then click a control to learn it. × removes that route.
Choose the clock
Each LFO has its own timing, shape and routes. In ♩ mode, Rate sets the duration of the entire cycle, with phase following the host position. In Hz mode, Rate is cycles per second. ×10 multiplies the free rate, and R restarts the free-running phase. Phase shifts the cycle position and HOLD freezes the current output.
Three ways to shape a cycle
- Built-in waves. Sine and triangle suit continuous moves. Rising and falling saws ramp then reset. Use square or Bin for high/low movement, and sample-and-hold or smooth random for irregular motion.
- Draw node curve. Double-click to add a node, drag to place it, move the small midpoint to bend a segment, or right-click an interior node to delete it. A curve can contain up to 16 nodes. Enable 1/16 snap for sixteen equal divisions of the cycle. Place two nodes at the same time for a sharp transition.
- Steps. Choose 4, 8, 12 or 16 steps. Drag in the display to paint levels or right-drag to clear them. Use All on, Clear, Invert, or the die to generate a new rhythm. Divide the full Rate cycle by the step count to find the duration of one step.
Depth scales the swing, Offset raises or lowers it, Smooth rounds the transitions, and Jitter adds random variation. Shape changes the contour depending on the wave. The lower Steps control quantizes a waveform into levels. The Steps waveform mode lets you draw each step separately.
Eight waves and random probability
Sine moves continuously around the midpoint. Triangle rises and falls at an approximately constant rate. Saw Up and Saw Down travel in one direction and reset at the cycle boundary. Rectangle switches high and low. Use continuous shapes for timbral motion and Rectangle, Steps or Draw for clearly defined rhythmic changes.
Random holds one value per cycle, Bin chooses only 0 or 1, and Wander smoothly joins consecutive random values. With Bin Shape at zero, the probability of a high value is approximately 50%. Increasing Shape increases that probability, reaching always-high at maximum. A short random passage can repeat either value several times. Paint Steps when you need an exact number of active hits.
Rectangle Shape changes its high duration from 50% to 95%. For Sine, Triangle and saws, Shape redistributes time within the cycle toward its end. Random values are derived from the LFO identity and cycle number, giving repeatable results at the same musical position.
Depth, Offset, Smooth and quantization
The LFO applies the wave, Jitter and level quantization before Depth and Offset, then smoothing. Let w be the wave value from 0–1, d be Depth from 0–1 and o be Offset from −1 to +1. Before smoothing, the output is clamp(0.5 + (w − 0.5) × d + 0.5 × o, 0, 1).
Depth 100% and Offset 0% retain the full range. Depth 50% narrows it to 25–75%. Depth 0% and Offset 0% produce a constant 50%. A Remote route then settles between its endpoints in parameter space. Offset shifts the result and clips it at the limits.
Jitter adds perturbations in eight subdivisions per cycle. The lower Steps control quantizes output into 2–16 levels. The Steps waveform mode assigns each time step its own value. Smooth depends on cycle duration, so the same percentage creates longer transitions at slower rates. Start with Smooth and Jitter at zero for precise cuts and increase them by ear.
Draw · Nodes and curvature
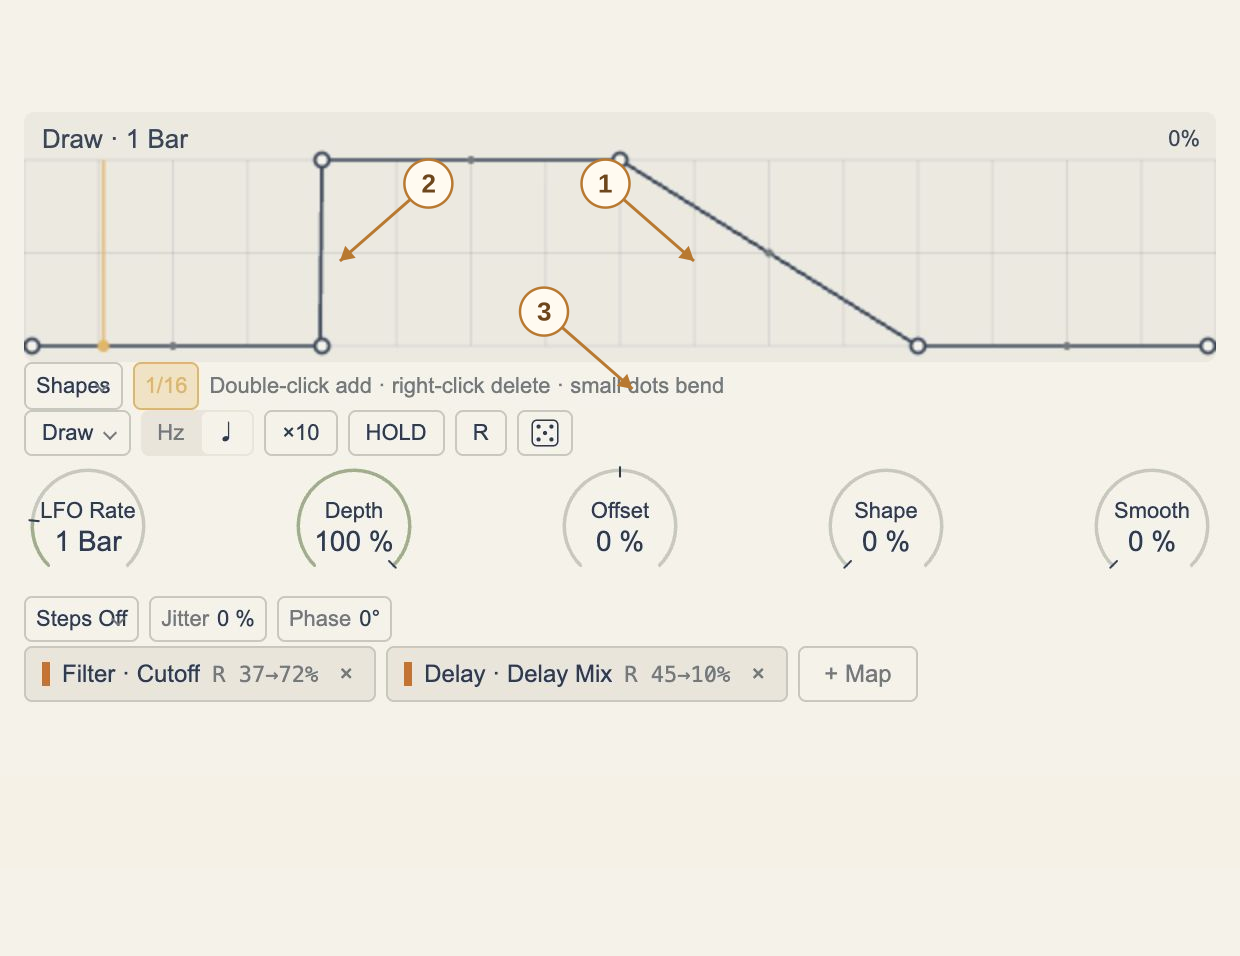
- 1Add and move nodes
Double-click empty space to add a node; drag a large node to change time and height.
- 2Vertical edges and holds
Two nodes at the quarter-cycle share a time position, creating a jump followed by a high hold.
- 3Shapes / 1/16
Load a shape or enable sixteenth-cycle snapping. Small dots bend segments; right-click deletes interior nodes.
- Select Draw node curve in the waveform menu. The screen shows a complete cycle.
- Double-click inside it to add a node. Drag horizontally for timing and vertically for level. Endpoints stay at the cycle boundaries but can move vertically.
- Drag a small midpoint to bend a segment and redistribute its rate of change.
- Enable 1/16 snapping for sixteen equal divisions, or disable it for free placement. Two nodes with the same time and different levels create a vertical edge.
- Right-click an interior node to delete it. Endpoints remain. A curve supports up to 16 nodes.
Shapes loads ready-made contours. Global Shape also bends the segments, so set it to zero when inspecting individual curves. Match endpoint levels for continuous sweeps or use different levels for a reset at the loop boundary, adding Smooth as needed.
With a one-bar cycle, each snap division is a sixteenth note. With a quarter-note cycle, those same sixteen divisions run faster. Snapping is relative to the whole cycle.
Steps · Gates and per-step levels
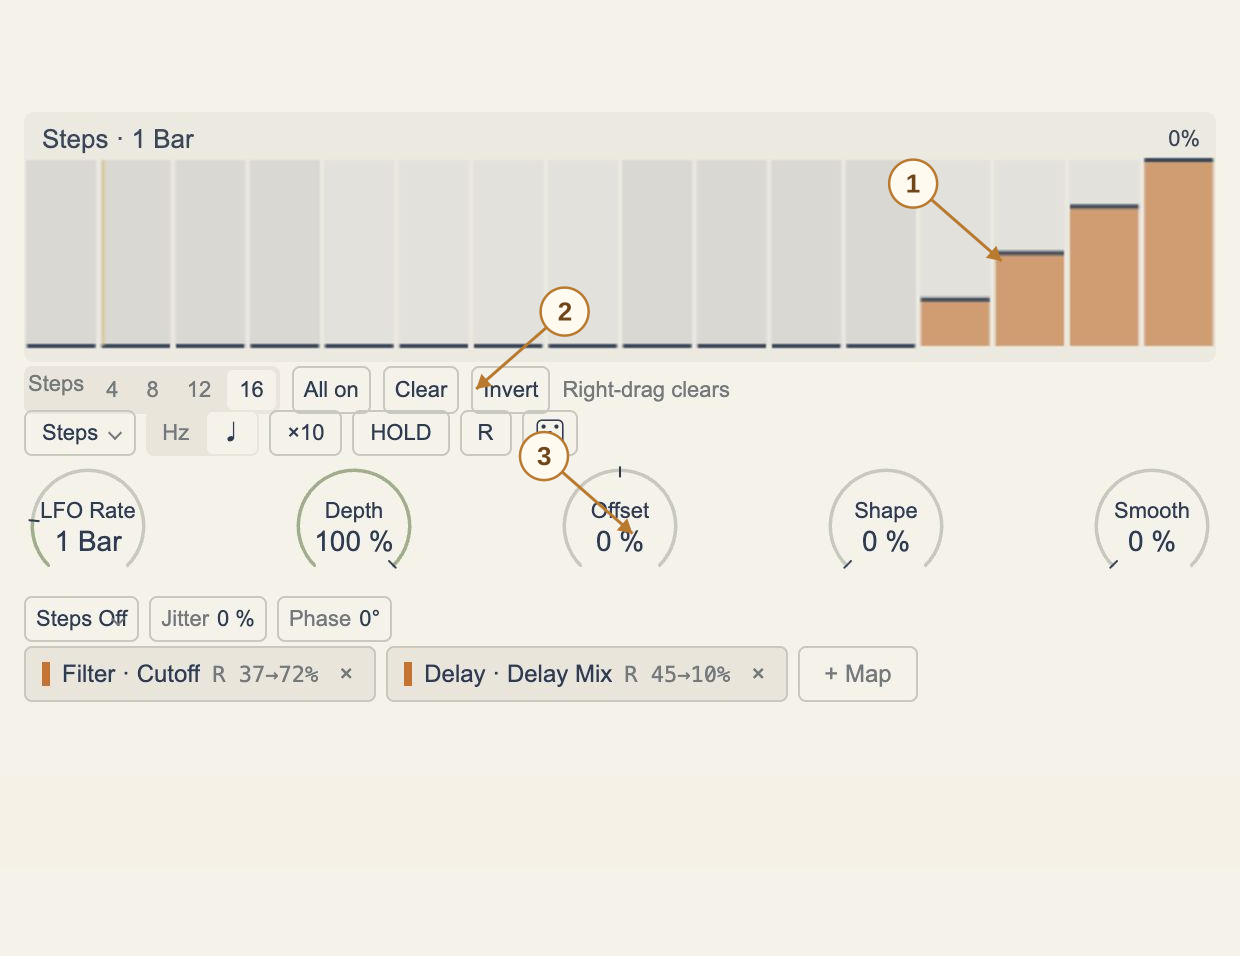
- 1Hold the first twelve steps low
The first twelve steps are zero; the final four rise to 25 / 50 / 75 / 100%.
- 2Step count and group actions
16 steps divide the whole cycle. Clear, Invert and All on edit it quickly.
- 3Whole cycle Rate = 1 Bar
This matches Rhythm at 16 sixteenth-note cells. Changing Rate to 1/4 makes each step four times faster.
Selecting Steps enables sync and starts with 1 Bar and 16 steps. Choose 4, 8, 12 or 16 steps afterward. Left-drag to paint levels. Right-drag or Alt-drag clears them. Level snapping shares the Draw editor’s 1/16 snap state: enabled gives 25% level increments, disabled allows finer levels. There is no separate snap button in the Steps toolbar. Change the snap state in Draw, then return to Steps when needed.
Map Steps to Drive Mix with Remote at 0→60%, then raise steps 3, 7, 11 and 15. Distortion enters at those positions. Set a step to 50% for a value halfway through the Remote range. All on, Clear and Invert operate on the step set.
Every target of one LFO shares its steps. For delay on steps 15–16 and drive on steps 3, 7 and 11, use separate LFOs. Different cycle lengths across four LFOs create evolving combinations while retaining predictable timing.
LFO parameter reference
LFO 1 is shown below. All four share these ranges but keep independent settings and routes. Free and synced rates use different parameters. ×10 affects only the free rate. See the preceding wave chapters for Shape and quantization behavior.
| Control | Range / choices | Use |
|---|---|---|
| LFO 1 Rate | 0.01–40 Hz | Cycles per second in free mode |
| LFO 1 Sync Rate | 8 Bars / 4 Bars / 2 Bars / 1 Bar / 1/2 / 1/2T / 1/4. / 1/4 / 1/4T / 1/8. / 1/8 / 1/8T / 1/16. / 1/16 / 1/16T / 1/32 / 1/64 | Synced duration of the whole cycle |
| LFO 1 x10 | Off / On | Multiply free rate by ten |
| LFO 1 Depth | 0–100 % | Scale around the midpoint |
| LFO 1 Offset | -100–100 % | Shift the entire output |
| LFO 1 Shape | 0–100 % | Wave-dependent shape |
| LFO 1 Smooth | 0–100 % | Output smoothing |
| LFO 1 Jitter | 0–100 % | Within-cycle perturbation |
| LFO 1 Phase | 0–360 deg | Cycle phase offset |
| LFO 1 Hold | Off / On | Hold current output |
| LFO 1 Steps | Off / 2 / 3 / 4 / 5 / 6 / 7 / 8 / 9 / 10 / 11 / 12 / 13 / 14 / 15 / 16 | Output level quantization |
Matrix · Routes, ranges and live values
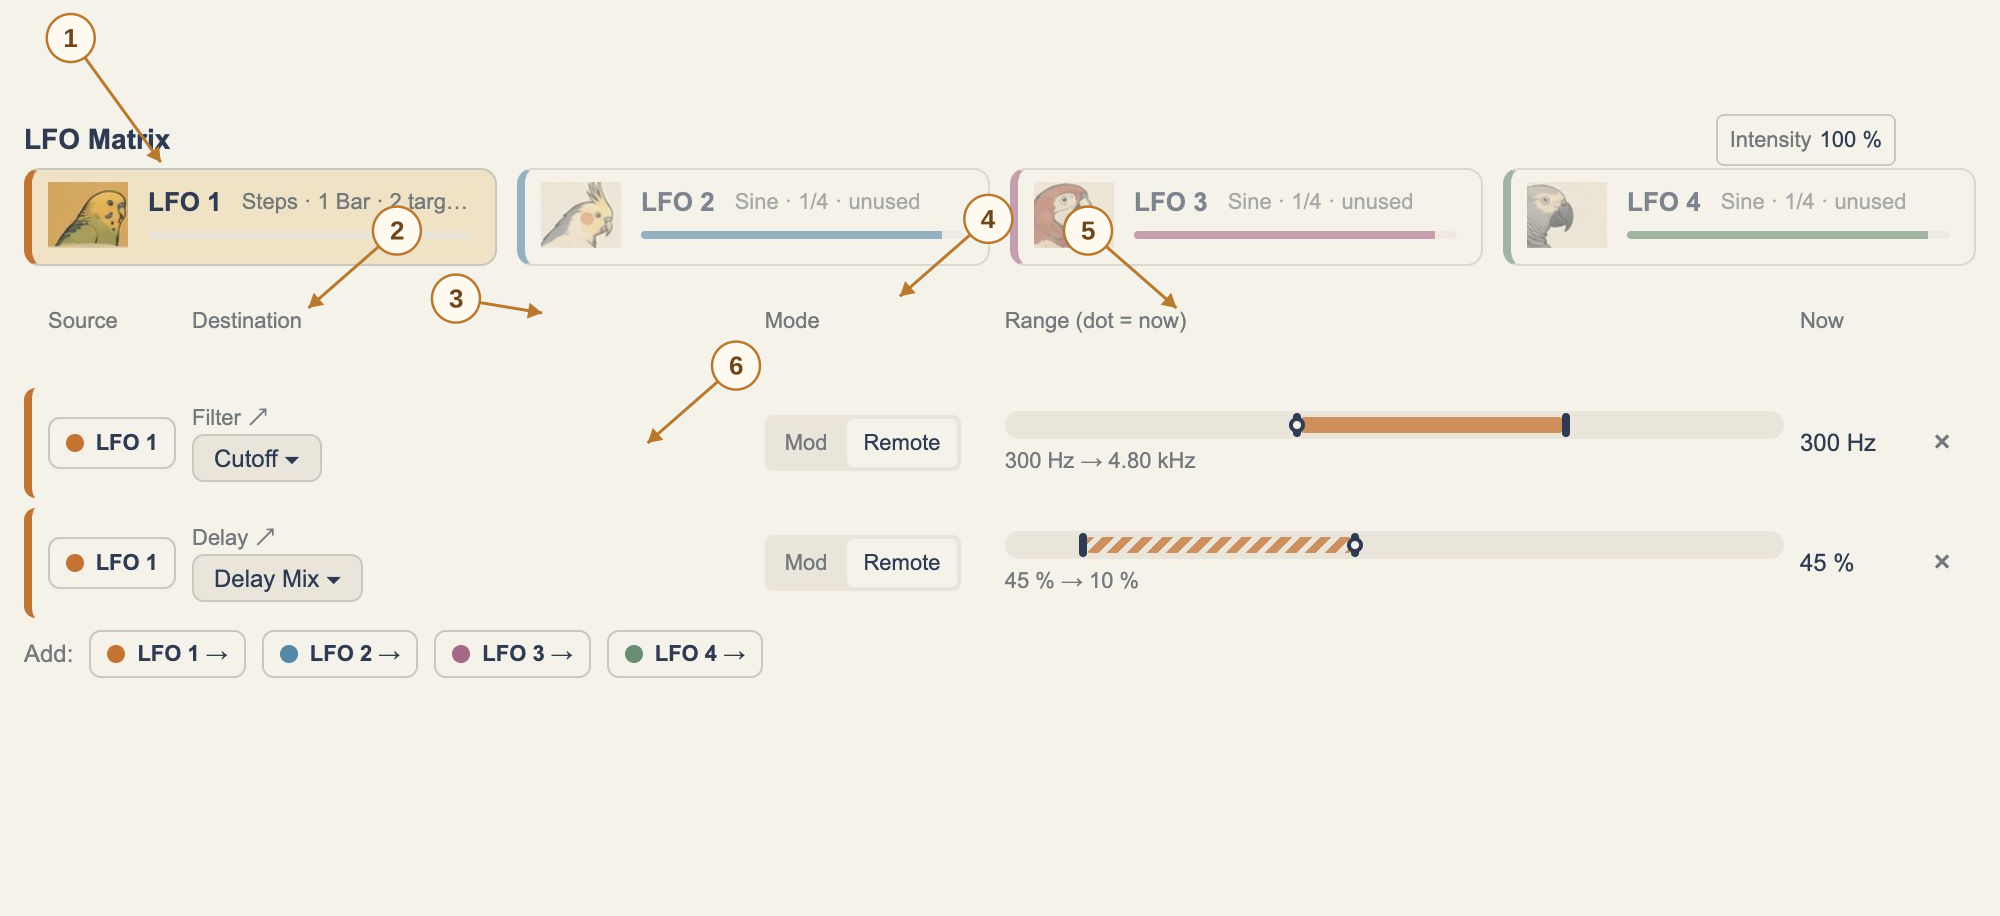
- 1Source card
Click LFO 1 to focus its routes, then again for all routes. Its bar shows LFO output, not audio level.
- 2Module and destination
The module name opens the effect; the lower selector changes the destination.
- 3Mod / Remote
Remote maps low and high output to endpoints. Mod adds movement to the base value.
- 4Range endpoints
Drag the endpoints. Cutoff rises while Delay Mix falls from 45% to 10%, driven by the same LFO.
- 5Now / ×
Now displays the effective value in parameter units. × removes only the route.
- 6Add a route
Choose the source LFO, module and parameter; up to eight routes per LFO.
Each LFO has eight target slots, for 32 routes across all four. Use + Map below an LFO and click a knob or switch to learn it. Press Esc to cancel. Or click an LFO in the Matrix Add row and choose a module and parameter. Click an LFO card to focus its group, then click it again to show all routes.
- Mod ±
- Moves on both sides of the base setting. Use it when the tone is already in place and needs some movement.
- Mod +
- Moves upward from the base. Use it to add drive, width or echo on chosen beats.
- Remote
- Maps the low and high LFO values to two endpoints. Drag the handles. The range is shown in the destination's own units.
- Inverted range
- Set the first endpoint higher than the second. The shaded span turns striped and the destination falls as the LFO rises.
The row color identifies its source. The dot and Now readout show the current effective value. Use the source button to move the route, the parameter menu to change the target, and × to remove it. A dim row indicates a switched-off effect module. Check routes individually before stacking several on one target, especially when using Remote.
Mapping math, endpoints and stacked routes
Range bars use normalized parameter positions from 0–1. With base b, LFO output u and route amount a, Mod + computes clamp(b + a × u). Mod ± computes clamp(b + a × (u − 0.5)). Thus a displayed ±40% spans approximately −20% to +20% of the parameter travel around its base with a full-depth LFO.
Remote computes lo + (hi − lo) × u. A lo value above hi reverses the range. Frequency and time controls can have curved scales, so the halfway position need not be the arithmetic mean of the two Hz or ms endpoints. Read Now for the physical value.
Several LFOs on one destination
Each update starts at the parameter base and applies routes in LFO 1–4 order, then slot order. Mod modifies the preceding result. Remote establishes its own position. At header Amount 100%, a later Remote replaces the earlier result on that destination. At partial Amount, each route moves partway from its incoming result to its mapped result.
Begin with separate targets and then experiment with overlap. Remove a route or temporarily narrow its range to identify its contribution. Values that exceed parameter limits are clipped and can spend part of a cycle at an extreme.
Amount, Depth and wet/dry balance
Depth changes one LFO's output swing. Route Amount changes one Mod mapping's width. Header Amount scales all routes and Rhythm time processing together. A module Mix controls the blend at that effect's position. Global Mix blends the entire processed chain with the original input.
For continuous targets, header Amount applies previous + (mapped − previous) × Amount. For switches and choices, values below 50% preserve the incoming state. Rhythm's time-processing mix also follows Amount. A manually held Fill triggers independently.
With a Remote cutoff sweep, lowering Depth concentrates movement between the endpoints. Lowering header Amount moves processing toward the target's base setting. Those resting positions can differ. Set header Amount to zero and inspect Matrix to confirm the underlying tone.
Walkthrough · Reverse, open the filter and pull back the echo
- 1Hold the first twelve steps low
The first twelve steps are zero; the final four rise to 25 / 50 / 75 / 100%.
- 2Step count and group actions
16 steps divide the whole cycle. Clear, Invert and All on edit it quickly.
- 3Whole cycle Rate = 1 Bar
This matches Rhythm at 16 sixteenth-note cells. Changing Rate to 1/4 makes each step four times faster.
- 1Source card
Click LFO 1 to focus its routes, then again for all routes. Its bar shows LFO output, not audio level.
- 2Module and destination
The module name opens the effect; the lower selector changes the destination.
- 3Mod / Remote
Remote maps low and high output to endpoints. Mod adds movement to the base value.
- 4Range endpoints
Drag the endpoints. Cutoff rises while Delay Mix falls from 45% to 10%, driven by the same LFO.
- 5Now / ×
Now displays the effective value in parameter units. × removes only the route.
- 6Add a route
Choose the source LFO, module and parameter; up to eight routes per LFO.
Loop one bar of 4/4 drums and load Default. Put Delay after Rhythm, enable Filter and Delay, choose LP, and start with modest delay feedback. Set Amount and global Mix to 100%.
- Write the time action. In Rhythm, set Cell to 1/16 and Cells to 16. Drag across cells 15–16 on Reverse to draw one block. Leave the earlier 14 cells empty.
- Draw a modulation cycle of the same length. Select Steps on LFO 1. Set ♩, Rate 1 Bar, 16 steps, Phase 0°, Depth 100%, Offset 0% and Smooth 0%. Use Clear, then paint steps 13–16 to roughly 25%, 50%, 75% and 100%. Each LFO step now lasts one sixteenth note, matching a Rhythm cell.
- Route the shape in Matrix. Add LFO 1 → Filter Cutoff in Remote mode and drag its endpoints to about 300 Hz → 4.8 kHz. Add LFO 1 → Delay Mix in Remote mode, then set about 45% → 10%. Nearby values work for this example.
- Start on the bar line and verify. The first 12 cells keep the filter low and delay wetter. From cell 13 onward the filter opens as the delay recedes, and the final two cells reverse. Check that the two Matrix readouts travel in opposite directions. If they land on the wrong beat, confirm 1 Bar, Phase 0° and playback from the phrase's bar line.
- Save and perform. Lower Amount to halfway and listen for the change in intensity. Adjust global Mix to bring all processing back toward dry. Save the result under a new preset name.
To bring an effect in at a few chosen positions, use another Steps LFO on the module's Mix with Remote set to 0% → the desired wet level. Paint the chosen steps high. For a continuous filter sweep, use a slower sine LFO on a separate route.
Pitch · Transposition and layers
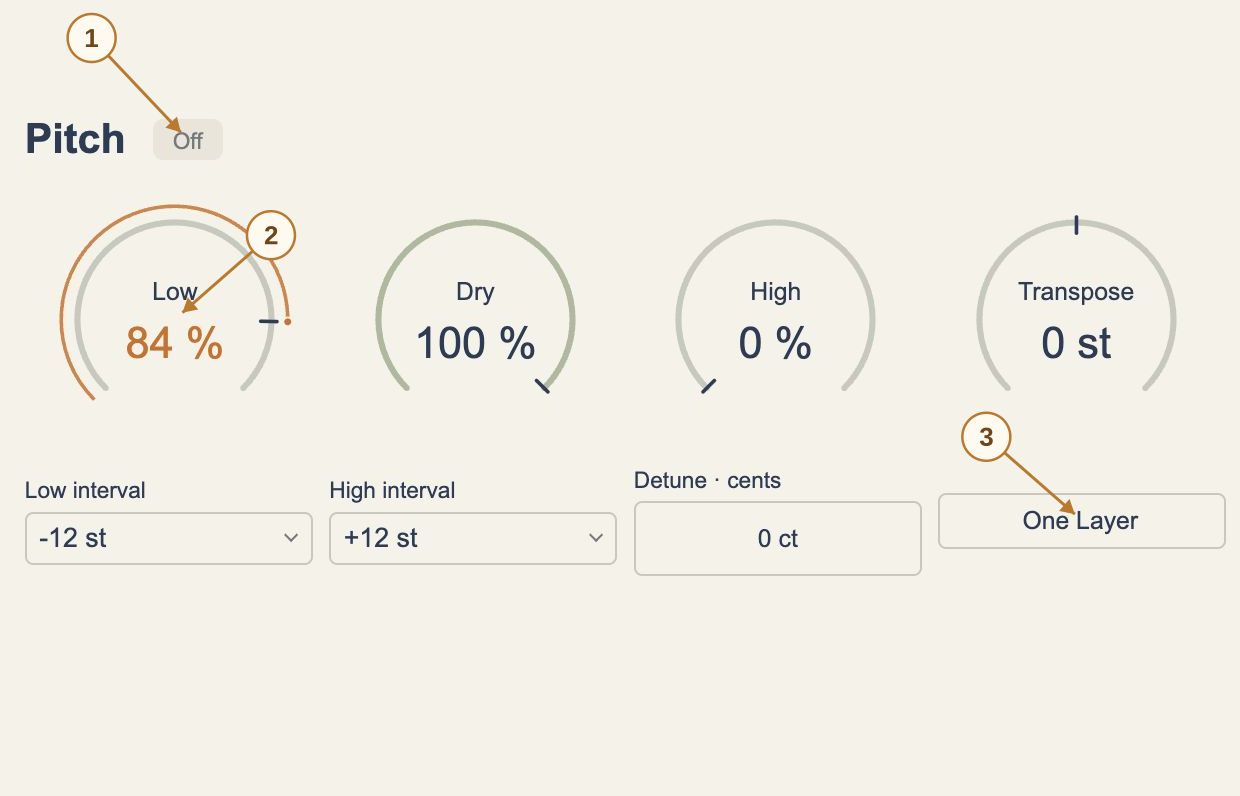
- 1Power / type
Enable processing first. For modules with a type selector, choose the algorithm before adjusting controls.
- 2Primary tone control
Read its units in the table below. Double-click to enter a value; Shift-drag for fine adjustment.
- 3Additional controls
These remain part of this module. Map eligible controls with + Map to add LFO movement.
Begin with Dry at 100% and Low / High at zero, then introduce one voice. Low Interval spans −24–0 semitones and High Interval 0–24. Transpose shifts the whole signal and Fine adjusts cents. Enable One Layer for single-voice switching such as random octaves. Disable it for layered harmony.
| Control | Range / choices | Use |
|---|---|---|
| Low Level | 0–100 % | Low voice level |
| Dry Level | 0–100 % | Dry voice level |
| High Level | 0–100 % | High voice level |
| Low Interval | -24–0 st | Low voice interval |
| High Interval | 0–24 st | High voice interval |
| Pitch | -24–24 st | Overall transpose |
| Fine | -100–100 ct | Fine detuning |
| One Layer | Off / On | Single-layer switching |
Set up and listen
Try Bin on Low Level, Remote 0→100%, Shape zero. Use Steps for octave changes on exact beats. Check One Layer before balancing the dry voice.
Lofi · Media and degradation
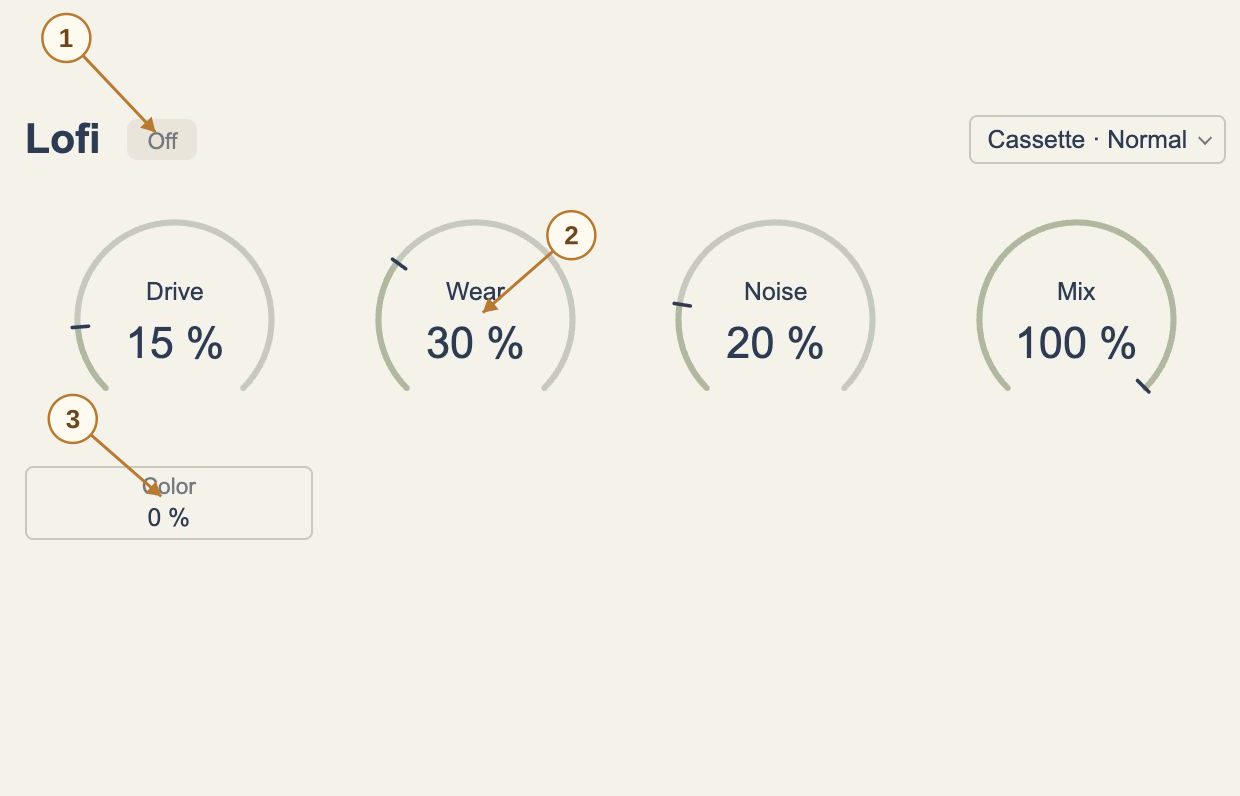
- 1Power / type
Enable processing first. For modules with a type selector, choose the algorithm before adjusting controls.
- 2Primary tone control
Read its units in the table below. Double-click to enter a value; Shift-drag for fine adjustment.
- 3Additional controls
These remain part of this module. Map eligible controls with + Map to add LFO movement.
The type menu contains five media families with three styles each. Radio colors the bandwidth, Vinyl emphasizes record wear, Cassette and VHS provide tape character, and Digital creates digital degradation. Choose the medium first, then adjust Wear and Noise. In digital types these control bit-depth and sample-rate degradation respectively.
| Control | Range / choices | Use |
|---|---|---|
| Lofi Type | Radio · Pocket AM / Radio · FM Air / Radio · Shortwave / Vinyl · Clean LP / Vinyl · Worn / Vinyl · Dusty / Cassette · Chrome / Cassette · Normal / Cassette · Micro / VHS · HiFi / VHS · Home / VHS · Tracking / Digital · 12-Bit / Digital · Crusher / Digital · Codec | Medium and style |
| Lofi Drive | 0–100 % | Drive coloration |
| Lofi Color | -100–100 % | Color shift |
| Lofi Wear | 0–100 % | Wear or bit-depth degradation |
| Lofi Noise | 0–100 % | Noise or sample-rate degradation |
| Lofi Mix | 0–100 % | Wet/dry blend |
Set up and listen
Use Steps on Mix for a radio-colored phrase ending, or a slow Wander with a narrow Wear range for irregular movement. Lower Noise while comparing to hear the source changes clearly.
The media-first workflow from MB Rack
Choose a medium, then a scene, then its intensity. Radio offers Pocket AM, FM Air and Shortwave. Vinyl runs from Clean LP to Worn and Dusty. Cassette offers Chrome, Normal and Micro; VHS offers HiFi, Home and Tracking. Digital offers 12-bit, Digital and Codec degradation.
Drive / Color: Drive changes saturation and density; Color changes spectral brightness. Lower Noise while evaluating coloration, then add wear and noise. Wear / Noise: these shape analog degradation and noise, or bit-depth and rate degradation in digital scenes.
Sequence the degradation in Motion
- Choose Radio or Cassette and start with module Mix at zero.
- Raise only phrase-ending steps on LFO 2. Map Remote to Lofi Mix, 0→60%.
- For a gradual transition into an older texture, use another slower LFO with a narrow Wear or Color range.
MB Rack's Texture Seed, multiband and Tonal routing are not controls in this Motion panel. Here, use LFOs, Matrix and module order to organize the movement.
Robot · Ring, Comb and Crush
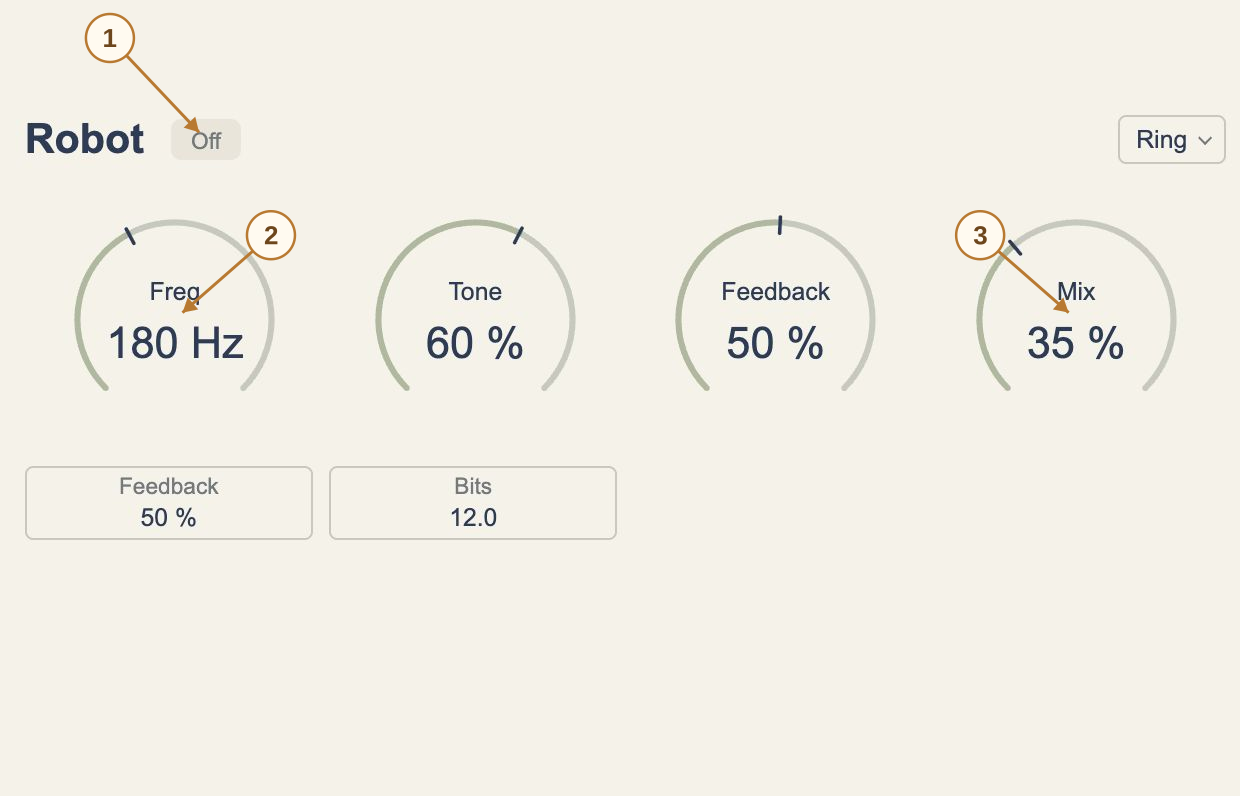
- 1Power / type
Enable processing first. For modules with a type selector, choose the algorithm before adjusting controls.
- 2Primary tone control
Read its units in the table below. Double-click to enter a value; Shift-drag for fine adjustment.
- 3Additional controls
These remain part of this module. Map eligible controls with + Map to add LFO movement.
Ring produces metallic, inharmonic color. Comb emphasizes resonant comb filtering. Crush changes digital texture. The visible controls depend on type: Crush exposes Bits, while other modes use Feedback. Choose the type before adjusting Freq and Tone.
| Control | Range / choices | Use |
|---|---|---|
| Robot Mode | Ring / Comb / Crush | Algorithm |
| Robot Freq | 20–5000 Hz | Frequency |
| Robot Tone | 0–100 % | Tone |
| Robot Feedback | 0–98 % | Feedback |
| Bits | 8–16 bit | Quantization depth |
| Robot Mix | 0–100 % | Blend |
Set up and listen
Bits spans 8–16 bit. Short steps on Robot Mix provide predictable accents. For frequency sweeps, begin with a narrow Freq range.
Filter · Cutoff, resonance and morph
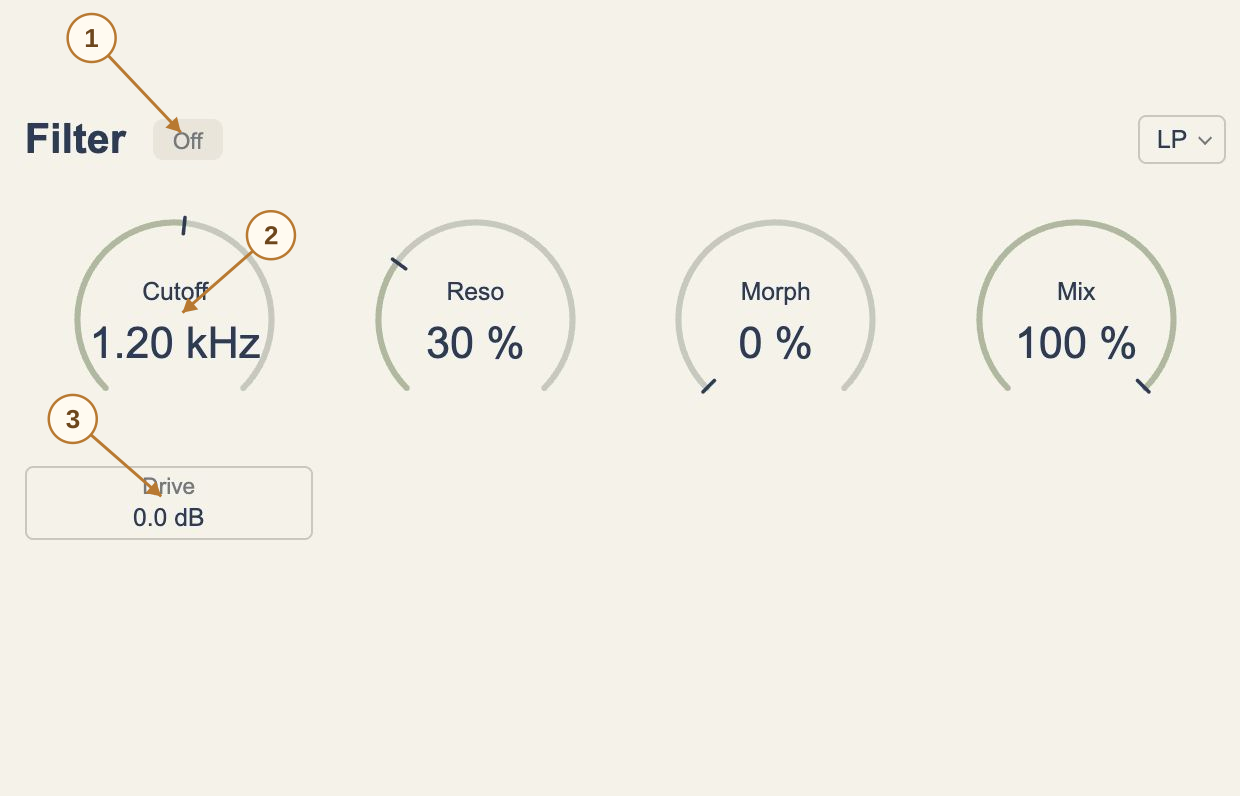
- 1Power / type
Enable processing first. For modules with a type selector, choose the algorithm before adjusting controls.
- 2Primary tone control
Read its units in the table below. Double-click to enter a value; Shift-drag for fine adjustment.
- 3Additional controls
These remain part of this module. Map eligible controls with + Map to add LFO movement.
LP retains frequencies below cutoff, HP above it, BP emphasizes a band, and Notch attenuates one. Cutoff locates the filter, Resonance emphasizes its edge, Morph changes its contour, and Drive adds coloration.
| Control | Range / choices | Use |
|---|---|---|
| Filter Type | LP / BP / HP / Notch | Filter type |
| Cutoff | 20–20000 Hz | Cutoff frequency |
| Resonance | 0–100 % | Resonance |
| Morph | 0–100 % | Contour morph |
| Filter Drive | 0–24 dB | Drive gain |
| Filter Mix | 0–100 % | Filter blend |
Set up and listen
Start a Remote cutoff sweep around 300 Hz→4.8 kHz. Steps creates per-beat changes and Draw can hold then open sharply. At high resonance, lower input or Out and audition the brightest point.
Drive · Six distortion types
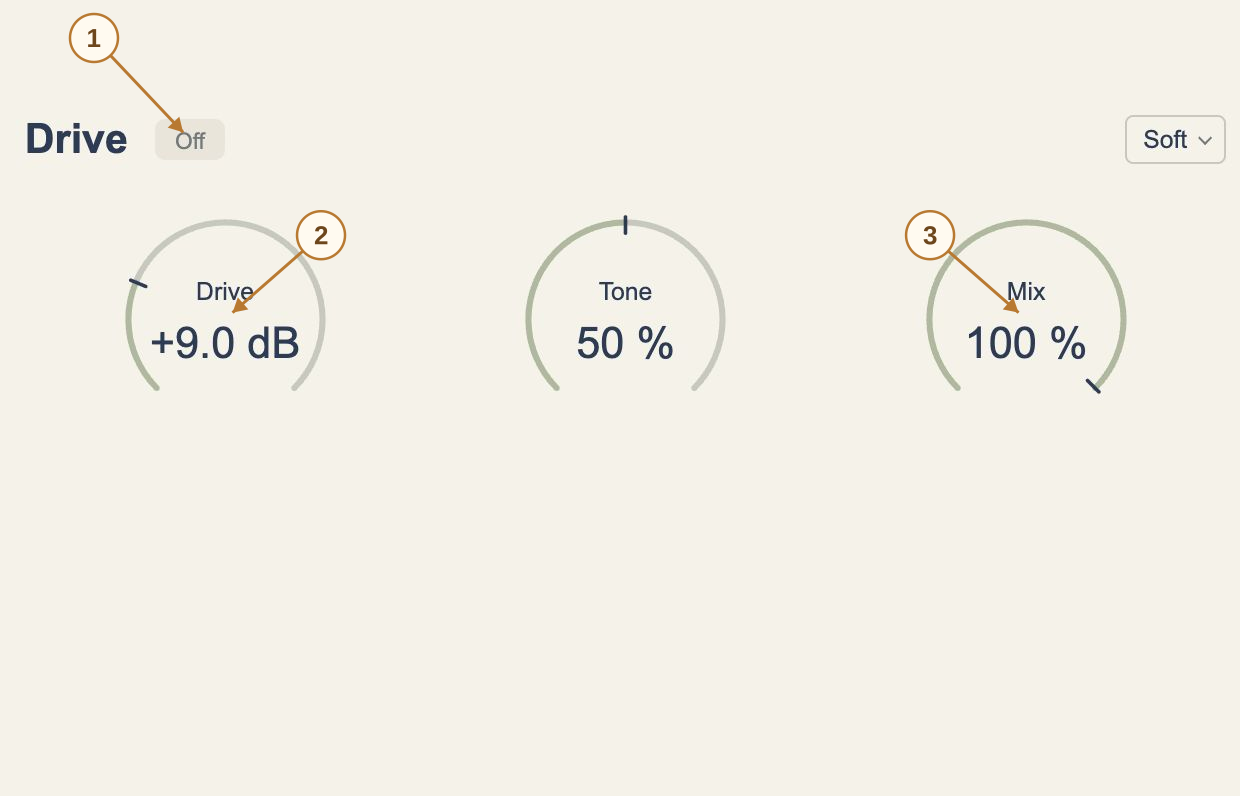
- 1Power / type
Enable processing first. For modules with a type selector, choose the algorithm before adjusting controls.
- 2Primary tone control
Read its units in the table below. Double-click to enter a value; Shift-drag for fine adjustment.
- 3Additional controls
These remain part of this module. Map eligible controls with + Map to add LFO movement.
Soft, Tape, Fold, Clip, Fuzz and Rectify cover gentle saturation through pronounced waveform shaping. Drive increases the nonlinear processing, Tone changes color, and Mix blends with the module input. The same Drive setting can sound and meter differently across algorithms.
| Control | Range / choices | Use |
|---|---|---|
| Drive Type | Soft / Tape / Fold / Clip / Fuzz / Rectify | Distortion algorithm |
| Drive | 0–36 dB | Drive gain |
| Drive Tone | 0–100 % | Tone |
| Drive Mix | 0–100 % | Blend |
Set up and listen
Set an audible Drive amount, then use Steps on Mix for selected accents. Audition Drive before and after Filter to compare filtering the generated harmonics with distorting a filtered signal.
Motion · Modulation and pan
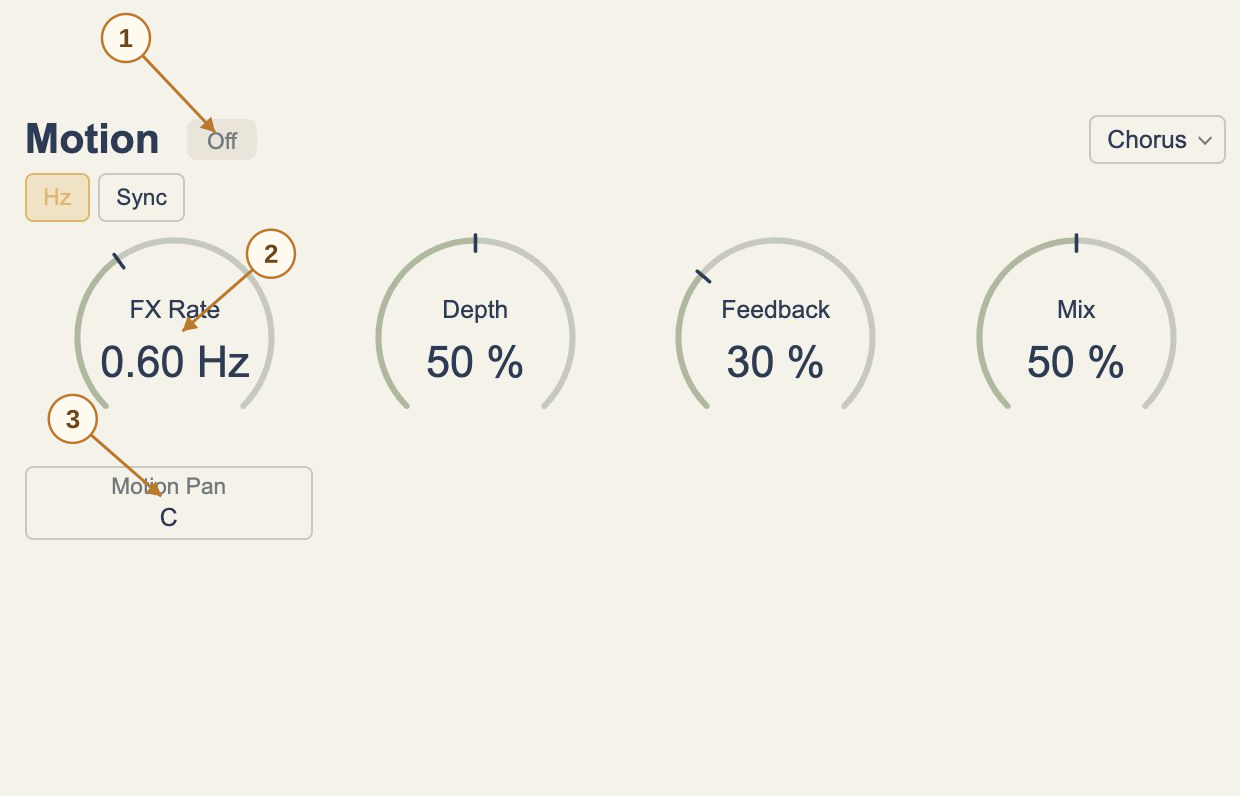
- 1Power / type
Enable processing first. For modules with a type selector, choose the algorithm before adjusting controls.
- 2Primary tone control
Read its units in the table below. Double-click to enter a value; Shift-drag for fine adjustment.
- 3Additional controls
These remain part of this module. Map eligible controls with + Map to add LFO movement.
Chorus, Flanger, Phaser, Tremolo, Auto-Pan, Doubler and Ensemble share macro controls. Rate sets the internal movement speed, Depth its strength, and Feedback emphasizes recirculation or resonance. Their audible roles vary with the algorithm.
| Control | Range / choices | Use |
|---|---|---|
| Motion Type | Chorus / Flanger / Phaser / Tremolo / Auto-Pan / Doubler / Ensemble | Modulation type |
| Motion Sync | Off / On | Internal rate sync |
| Motion Rate | 0.02–12 Hz | Free rate |
| FX Cycle | 8 Bars / 4 Bars / 2 Bars / 1 Bar / 1/2 / 1/2T / 1/4. / 1/4 / 1/4T / 1/8. / 1/8 / 1/8T / 1/16. / 1/16 / 1/16T / 1/32 / 1/64 | Sync division |
| Motion Depth | 0–100 % | Depth |
| Motion Feedback | 0–95 % | Feedback |
| Motion Pan | -1–1 pan | Pan position |
| Motion Mix | 0–100 % | Blend |
Set up and listen
Keep the module Rate slow while an external LFO moves Mix at 1/8. Each eighth-note entry then reveals a different point of the same slow chorus. Judge pan motion on a stereo track and stereo monitoring.
Listening concepts carried over from MB Rack Modulation
Doubler adds subtle double-tracking, Chorus creates a clearer chorus character, Ensemble creates a richer drifting group, Phaser produces moving phase color, and Tremolo is periodic level change. Motion also offers Flanger and Auto-Pan. These modes do not all change pitch in the same way.
Choose the mode at a low Mix, then adjust Rate and Depth. Fast, deep movement can disturb the pitch impression of a lead. Background parts can tolerate slower, broader motion. Use Auto-Pan or map Pan for stereo travel, then check mono.
Separate internal movement from external timing
- Choose a slow Chorus with moderate Depth.
- Use a one-bar Steps LFO in Remote mode on Motion Mix, raising only offbeats.
- The internal Rate shapes chorus motion; LFO Rate decides when it enters. They can run at different speeds.
MB Rack's Process / Width descriptions do not directly describe Motion's Feedback / Pan. Use the controls actually shown here. Internal delay times and stage counts are not assumed from MB Rack.
Delay · Echo, feedback and bandwidth
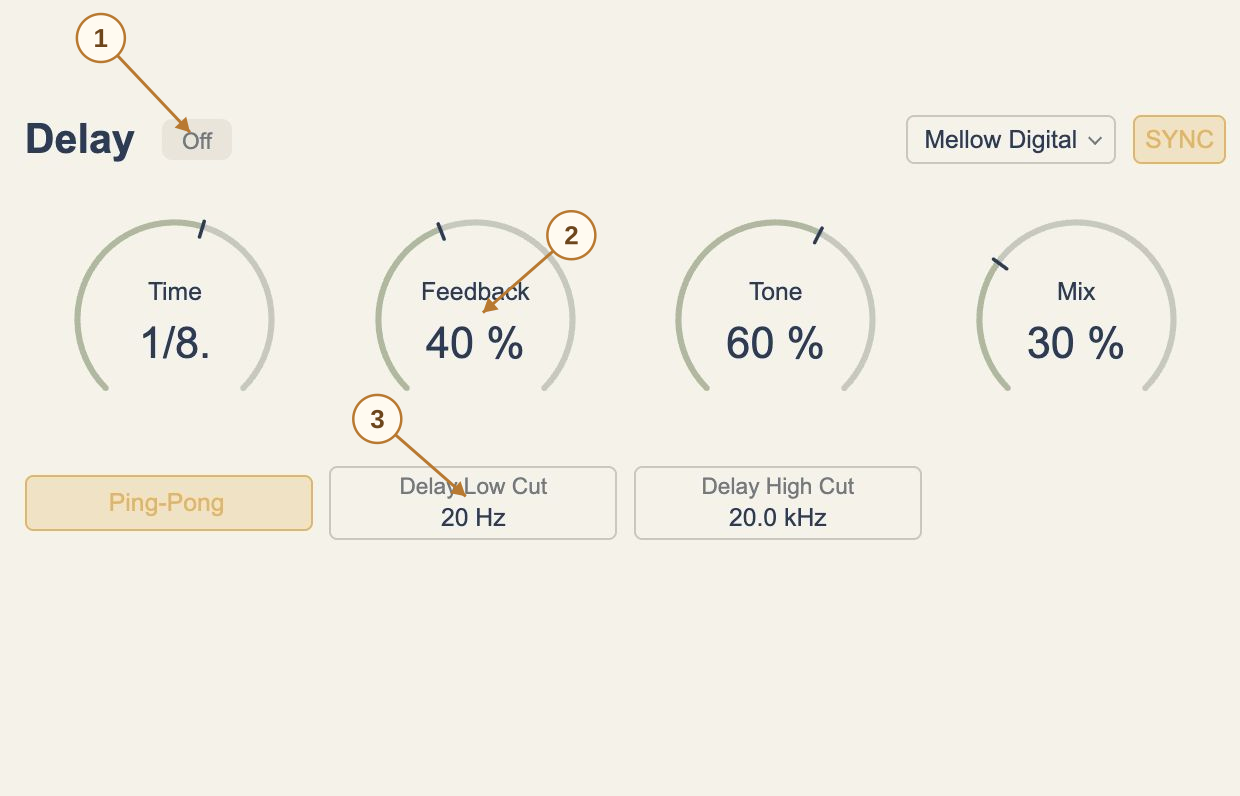
- 1Power / type
Enable processing first. For modules with a type selector, choose the algorithm before adjusting controls.
- 2Primary tone control
Read its units in the table below. Double-click to enter a value; Shift-drag for fine adjustment.
- 3Additional controls
These remain part of this module. Map eligible controls with + Map to add LFO movement.
Mellow Digital, Clean Digital, Tape Echo and Analog provide different echo characters. With SYNC on, Time shows a rhythmic division; with it off, Time is in milliseconds. Feedback controls recirculation and Ping-Pong distributes repeats across stereo channels.
| Control | Range / choices | Use |
|---|---|---|
| Delay Type | Mellow Digital / Clean Digital / Tape Echo / Analog | Delay type |
| Delay Sync | Off / On | Tempo sync |
| Delay Time | 1–2000 ms | Free delay time |
| Delay Division | 8 Bars / 4 Bars / 2 Bars / 1 Bar / 1/2 / 1/2T / 1/4. / 1/4 / 1/4T / 1/8. / 1/8 / 1/8T / 1/16. / 1/16 / 1/16T / 1/32 / 1/64 | Sync division |
| Delay Feedback | 0–95 % | Feedback |
| Delay Tone | 0–100 % | Echo tone |
| Ping-Pong | Off / On | Stereo ping-pong |
| Delay Low Cut | 20–20000 Hz | Low cut |
| Delay High Cut | 20–20000 Hz | High cut |
| Delay Mix | 0–100 % | Delay blend |
Set up and listen
Map Mix first for echo accents, then Feedback for accumulation. Large time changes can alter echo placement or perceived pitch. Lower Low Cut retains more bass; lower High Cut darkens the repeats.
Timing and tone: the Space listening workflow
First audition millisecond spacing with sync off, then compare eighth notes, quarter notes and dotted values. Dotted timing postpones each repeat; it does not increase feedback. Feedback recirculates part of each repeat. Mix sets the blend with the module input. Increasing them produces different results.
Mellow / Clean / Tape / Analog: compare the characters at the same time and similar feedback, then adjust Tone. Tape and Analog provide colored repeats; Clean retains a clear outline. Ping-Pong distributes repeats across stereo channels.
An echo on the end of a phrase
- Sync to 1/8 or a dotted division and start with low Feedback.
- Use Low Cut to remove unnecessary bass and High Cut to darken repeats.
- Map Steps through Remote to Delay Mix, raising only the last few steps. Then try a narrow Feedback route and compare accumulation.
Mix is an output blend, not a send-input switch. Reducing it pulls the audible echo back. It does not behave like stopping new signal at MB Rack's Send while leaving the return open. This distinction determines whether a rhythmic gate hides a tail.
Space · Reverb and return controls
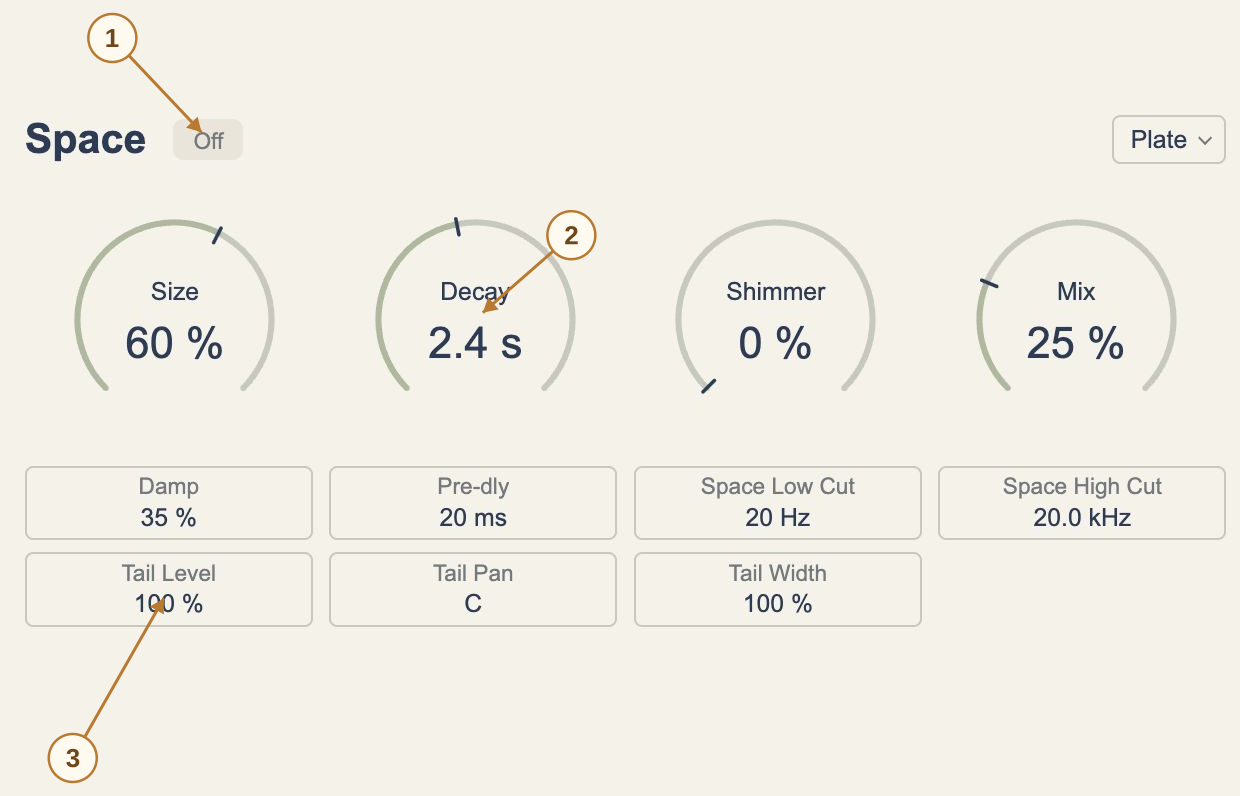
- 1Power / type
Enable processing first. For modules with a type selector, choose the algorithm before adjusting controls.
- 2Primary tone control
Read its units in the table below. Double-click to enter a value; Shift-drag for fine adjustment.
- 3Additional controls
These remain part of this module. Map eligible controls with + Map to add LFO movement.
Size sets spatial scale, Decay the tail duration, Pre-delay separates the input and reverb onset, and Damp changes high-frequency decay. Shimmer introduces an upward pitched character. Learn a type with shorter Decay and lower Mix before extending it.
| Control | Range / choices | Use |
|---|---|---|
| Space Type | Room / Plate / Hall / Plate 140 / Plate 240 / Vintage / Progenitor / Chamber / Air / Shimmer / Bloom / Cathedral / Gated / Ambience | Space algorithm |
| Size | 0–100 % | Size |
| Decay | 0.2–20 s | Decay |
| Pre-delay | 0–250 ms | Pre-delay |
| Damp | 0–100 % | Damping |
| Shimmer | 0–100 % | Shimmer |
| Space Mix | 0–100 % | Reverb blend |
| Space Low Cut | 20–20000 Hz | Return low cut |
| Space High Cut | 20–20000 Hz | Return high cut |
| Tail Level | 0–100 % | Return level |
| Tail Pan | -1–1 pan | Return pan |
| Tail Width | 0–200 % | Return width |
Set up and listen
There are 14 types: Room, Plate, Hall, Plate 140, Plate 240, Vintage, Progenitor, Chamber, Air, Shimmer, Bloom, Cathedral, Gated and Ambience. Tail Width is at its reference width at 100%, narrows toward 0%, and widens above 100%. Combine it with Tail Pan for moving returns.
What decay, pre-delay and filtering each solve
Follow MB Rack Space's listening sequence: establish the space, separate the direct sound from the tail, then shape the return bandwidth. Decay sets tail duration. Pre-delay leaves a gap before the reverb onset, helping attacks remain clear without delaying the whole dry signal. Damp changes how high frequencies decay over time; High Cut removes upper bandwidth instead.
Low Cut / High Cut: low cut prevents bass buildup and high cut restrains bright reflections or sibilance. Too much low cut removes weight; too much high cut moves the tail far back. Establish its tone before modulating these frequencies.
Turn long tails into readable rhythm
- Start Plate or Chamber at low Mix. Increase Pre-delay to retain consonants and plucked attacks.
- Map Steps to Tail Level so an evolving tail appears only on selected beats.
- Use a slower LFO for a narrow Tail Pan movement, retain a stable direct image and check mono.
MB Rack combines reverb and delay inside Space; Motion separates them. Delay before Space envelops the echoes in reverb. Space before Delay sends the reverb output into echoes. Each uses its current module Mix. This is not MB Rack's Parallel / Send routing and does not provide the same Balance or Duck controls.
Reverb returns and spatial rhythm
Space Tail Level, Tail Pan and Tail Width act on the reverb return. Reverb keeps evolving underneath, so opening a gate reveals the tail at its current point. Mix sets the overall reverb blend. Tail Level can add rhythm while retaining the space settings.
- Enable Space, choose a longer Decay and listen to the tail.
- Set LFO 2 to Steps, 1 Bar and 16 steps, raising only 3, 7, 11 and 15.
- Map it to Space → Tail Level in Remote mode, 0→100%.
- Use a slower Triangle on LFO 3 to move Tail Pan left to right. Different cycle lengths place each gate opening at a different pan position.
Low Cut removes excessive low-frequency return energy. High Cut darkens it. Start gently and keep Low Cut below High Cut. A high low-cut setting combined with a low high-cut setting leaves a narrow band and a lighter sound.
Presets, A/B and global controls
Browse, save and transfer
Click the preset name to open the browser. Browse categories or search by name, use the star for favorites, and use the arrows to step through presets. Save an edited patch in the user preset library. Switch A/B to compare two states. The arrow between them copies the active slot to the other slot.
The DAW session stores the plug-in instance state. To back it up separately or move it to another Mac, export a .budgiemotion file from the gear menu using Export Budgie settings, then import it in the destination instance. Install and activate Motion on the destination device.
Amount, Mix, Out, AG and B
- Amount
- Scales continuous route movement and the strength of Rhythm time actions. Discrete mappings stay at their base state below 50%. A manually held Fill can still be triggered. At 0%, the modules' base tone can still be heard.
- Mix
- Blends the complete processed signal with the original input. Each module retains its own Mix.
- Out · AG · B
- Out adjusts final level. AG slowly matches average loudness for comparisons. B bypasses processing. Output Protection in the gear menu controls peaks.
DAW automation and performance
Use the host parameter list or touch automation to record knob movements. Automate header Amount to shape the overall activity of a phrase, or global Mix for a complete effect fade. Confirm the host's automation write mode and record a short loop first.
Host automation updates parameter bases, then mappings act on them. Mod follows the moving base. Full-strength Remote controls the final position from its endpoints. Lower header Amount to hear the underlying automation clearly.
Fill has its own switch parameter for host sequencing. For controller performance, assign MIDI controls to plug-in parameters in the DAW. Saving the project stores instance parameters, mappings, the sequence, custom pattern and module order.
Latency, sharp transitions and smoothing
The current version reports 0 samples of compensation latency to the host. Interface buffering, host scheduling, the audible response of pitch processing, and the timing settings in delay and reverb still affect what you hear. The gear menu's 0 samples refers to host compensation.
Continuous effect controls receive short de-click transitions. Most use roughly 4 ms for a full-range move. Filter cutoff, resonance and Morph use about 15 ms; Drive gain about 12 ms; Motion depth and feedback about 25 ms; Robot frequency about 40 ms; and Lofi Wear about 60 ms. Smaller moves may take less time, and individual effects may apply further smoothing.
A vertical drawn edge creates a clear rhythmic trigger while audio controls retain a protective transition. LFO Smooth adds user-controlled smoothing to the curve. If a result feels too soft, reduce Smooth first, then consider the target effect's response.
Editing gestures and shortcuts
| Gesture | Action |
|---|---|
| Drag / Shift-drag a knob | Adjust / fine adjustment |
| Double-click a knob | Enter its value in place. Enter confirms, Esc cancels. |
| Cmd-Z / Cmd-Shift-Z | Undo / redo |
| Drag a module tab | Change processing order |
| + Map then click a control | Create a route. Esc leaves learning. |
| Double-click Draw / right-click a node | Add / delete an interior node |
| Right-drag or Alt-drag in Steps | Clear touched steps |
| Hold Fill / Shift-click | Momentary performance / latch |
| Right-click a starting pattern | Assign it as Fill |
In this manual, / focuses search, Esc closes it, and Enter follows the first result. Print produces the current language edition.
Troubleshooting and settings
- Silent plug-in
- Verify the track input and check the license status in the gear menu. If needed, activate or start the trial in HUB, then check again.
- Matrix moves, but the audio sounds the same
- Check the target module's power and Mix, then global Mix, Amount and B. Check for identical range endpoints, HOLD or low LFO Depth.
- Timing is off
- Loop from the host bar line. Check Rhythm's cell count times its cell duration, then synced LFO Rate, step count and Phase. In 4/4, 16 sixteenth-note cells line up with 16 Steps over a 1 Bar cycle.
- Overshoot or clicks at transitions
- Narrow the mapped range or add a little Smooth. For time effects, reduce row depth where available or adjust De-click. Lower the output and check for high resonance, feedback or stacked saturation.
- Latency and older sessions
- Version 1.0 reports 0 samples of plug-in latency. Delay repeats and Space pre-delay still follow their own timings. Older sessions may display Legacy Stutter or Legacy Reverse. For new patches, use the time effects in Rhythm.
Use the header for window scale and theme. Change language or scene animation, or reset the module order from the gear menu.